前言
本站基于Hexo搭建,使用的是🦋Butterflyv4.3.1版本, 如果版本不同可能会存在差异,请悉知。
注意:
我的博客根目录路径为 【D:/code/hexo_butterfly】,下文所说的根目录都是指代此路径,将用[BlogRoot]代替。
修改站点配置文件_config.yml,路径为[BlogRoot]/_config.yml。
修改主题配置文件_config.butterfly.yml,路径为[BlogRoot]/_config.butterfly.yml。
如果目录[BlogRoot]/themes下没有任何文件的,请用Git拉取themes目录,推荐使用gitee。
1
| 1 git clone -b master https://gitee.com/immyw/hexo-theme-butterfly.git themes/butterfly
|
diff代码块中的+和-是指应该添加和删去的内容
侧边栏微博热搜
查看步骤
- 在
[BlogRoot]/source/js目录下创建 card_weibo.js 文件,具体代码如下:
1
2
3
4
5
6
7
8
9
10
11
12
13
14
15
16
17
18
19
20
21
22
23
24
| fetch('https://weibo.eurkon.com/api').then(data => data.json()).then(data => {
let html = '<style>.weibo-new{background:#ff3852}.weibo-hot{background:#ff9406}.weibo-jyzy{background:#ffc000}.weibo-recommend{background:#00b7ee}.weibo-adrecommend{background:#febd22}.weibo-friend{background:#8fc21e}.weibo-boom{background:#bd0000}.weibo-topic{background:#ff6f49}.weibo-topic-ad{background:#4dadff}.weibo-boil{background:#f86400}#weibo-container{overflow-y:auto;-ms-overflow-style:none;scrollbar-width:none}#weibo-container::-webkit-scrollbar{display:none}.weibo-list-item{display:flex;flex-direction:row;justify-content:space-between;flex-wrap:nowrap}.weibo-title{white-space:nowrap;overflow:hidden;text-overflow:ellipsis;margin-right:auto}.weibo-num{float:right}.weibo-hotness{display:inline-block;padding:0 6px;transform:scale(.8) translateX(-3px);color:#fff;border-radius:8px}</style>'
html += '<div class="weibo-list">'
let hotness = {
'爆': 'weibo-boom',
'热': 'weibo-hot',
'沸': 'weibo-boil',
'新': 'weibo-new',
'荐': 'weibo-recommend',
'音': 'weibo-jyzy',
'影': 'weibo-jyzy',
'剧': 'weibo-jyzy',
'综': 'weibo-jyzy'
}
for (let item of data) {
html += '<div class="weibo-list-item"><div class="weibo-hotness ' + hotness[(item.hot || '荐')] + '">' + (item.hot || '荐') + '</div>'
+ '<span class="weibo-title"><a title="' + item.title + '"href="' + item.url + '" target="_blank" rel="external nofollow noreferrer">' + item.title + '</a></span>'
+ '<div class="weibo-num"><span>' + item.num + '</span></div></div>'
}
html += '</div>'
document.getElementById('weibo-container').innerHTML = html
}).catch(function (error) {
console.log(error);
});
|
- 在
[Blogroot]\_config.butterfly.yml 的侧边栏配置项和 CDN 配置项增加以下内容。
1
2
3
4
5
6
7
8
9
10
11
| # aside (側邊欄)
# --------------------------------------
aside:
enable: true
...
+ card_weibo:
+ enable: true
inject:
bottom:
# 其他内容
+ - <script src="/js/weibo.js"></script>
|
- 在
[BlogRoot]\themes\butterfly\layout\includes\widget 目录下创建 card_weibo.pug 文件,添加以下内容:
1
2
3
4
5
6
7
| if theme.aside.card_weibo.enable
.card-widget.card-weibo
.card-content
.item-headline
i.fab.fa-weibo
span= _p('微博热搜')
#weibo-container(style="width: 100%; height: 150px;font-size: 95%;")
|
- 在
[BlogRoot]\themes\butterfly\layout\includes\widget\index.pug 文件中增加以下内容:
1
2
3
4
5
6
7
8
9
10
11
12
13
14
15
| #aside-content.aside-content
//- post
if is_post()
if showToc && theme.toc.style_simple
.sticky_layout
include ./card_post_toc.pug
else
.sticky_layout
if showToc
+ !=partial('includes/widget/card_weibo', {}, {cache: true})
else
//- page
.sticky_layout
+ !=partial('includes/widget/card_weibo', {}, {cache: true})
|
这里采用的是eurkon搭建的API https://weibo.eurkon.com/api,如果你想自建API,点击这里
侧边栏Pixiv日榜
查看步骤
- 在
[BlogRoot]/themes/butterfly/layout/includes/widget 文件夹新建card_pixiv.pug文件,文件内容:
1
2
3
4
5
6
7
| .card-widget.card-pixiv
.card-content
.item-headline
i.fa.fa-image(aria-hidden="true")
//- span后为日榜标题,可以自行更改
span Pixiv日榜Top50
iframe(src="https://cloud.mokeyjay.com/pixiv" frameborder="0" style="width:99%;height:380px;margin:0;")
|
https://cloud.mokeyjay.com/pixiv 使用的是 mokeyjay 提供的API,也可以自行搭建,搭建方式请看这里。
- 在
[BlogRoot]/themes/butterfly/layout/includes/widget/index.pug 加入以下内容:
1
2
3
| //- page
if theme.aside.card_pixiv
!=partial('includes/widget/card_pixiv', {}, {cache:true})
|
- 编辑
[BlogRoot]/_config.butterfly.yml文件, 找到aside配置项,添加如下代码:
1
2
3
| aside:
card_pixiv:
enable: true
|
如何解决Vercel被墙问题
查看步骤
使用vercel部署好网站或者服务后,很多朋友会发现是无法通过vercel提供的域名直接访问的,这是因为vercel的域名早就已经被大陆屏蔽了,这里分享一下我是如何解决vercel被墙问题的。
- 首先你需要购买一个域名,腾讯云、华为云、阿里云或者cloudflare都是可以的,我购买的是腾讯云的域名,这里以腾讯云为例。
- 进入腾讯云域名解析页,配置域名解析,如下图所示,这里我配置的主机记录
@(表示域名的根路径,比如yukinoyy.cn)为A类型的ipv4地址,指向vercel的ip地址76.223.126.88,主机记录www为CNAME类型的子域,指向vercel在大陆的dns解析服务cname-china.vercel-dns.com.。

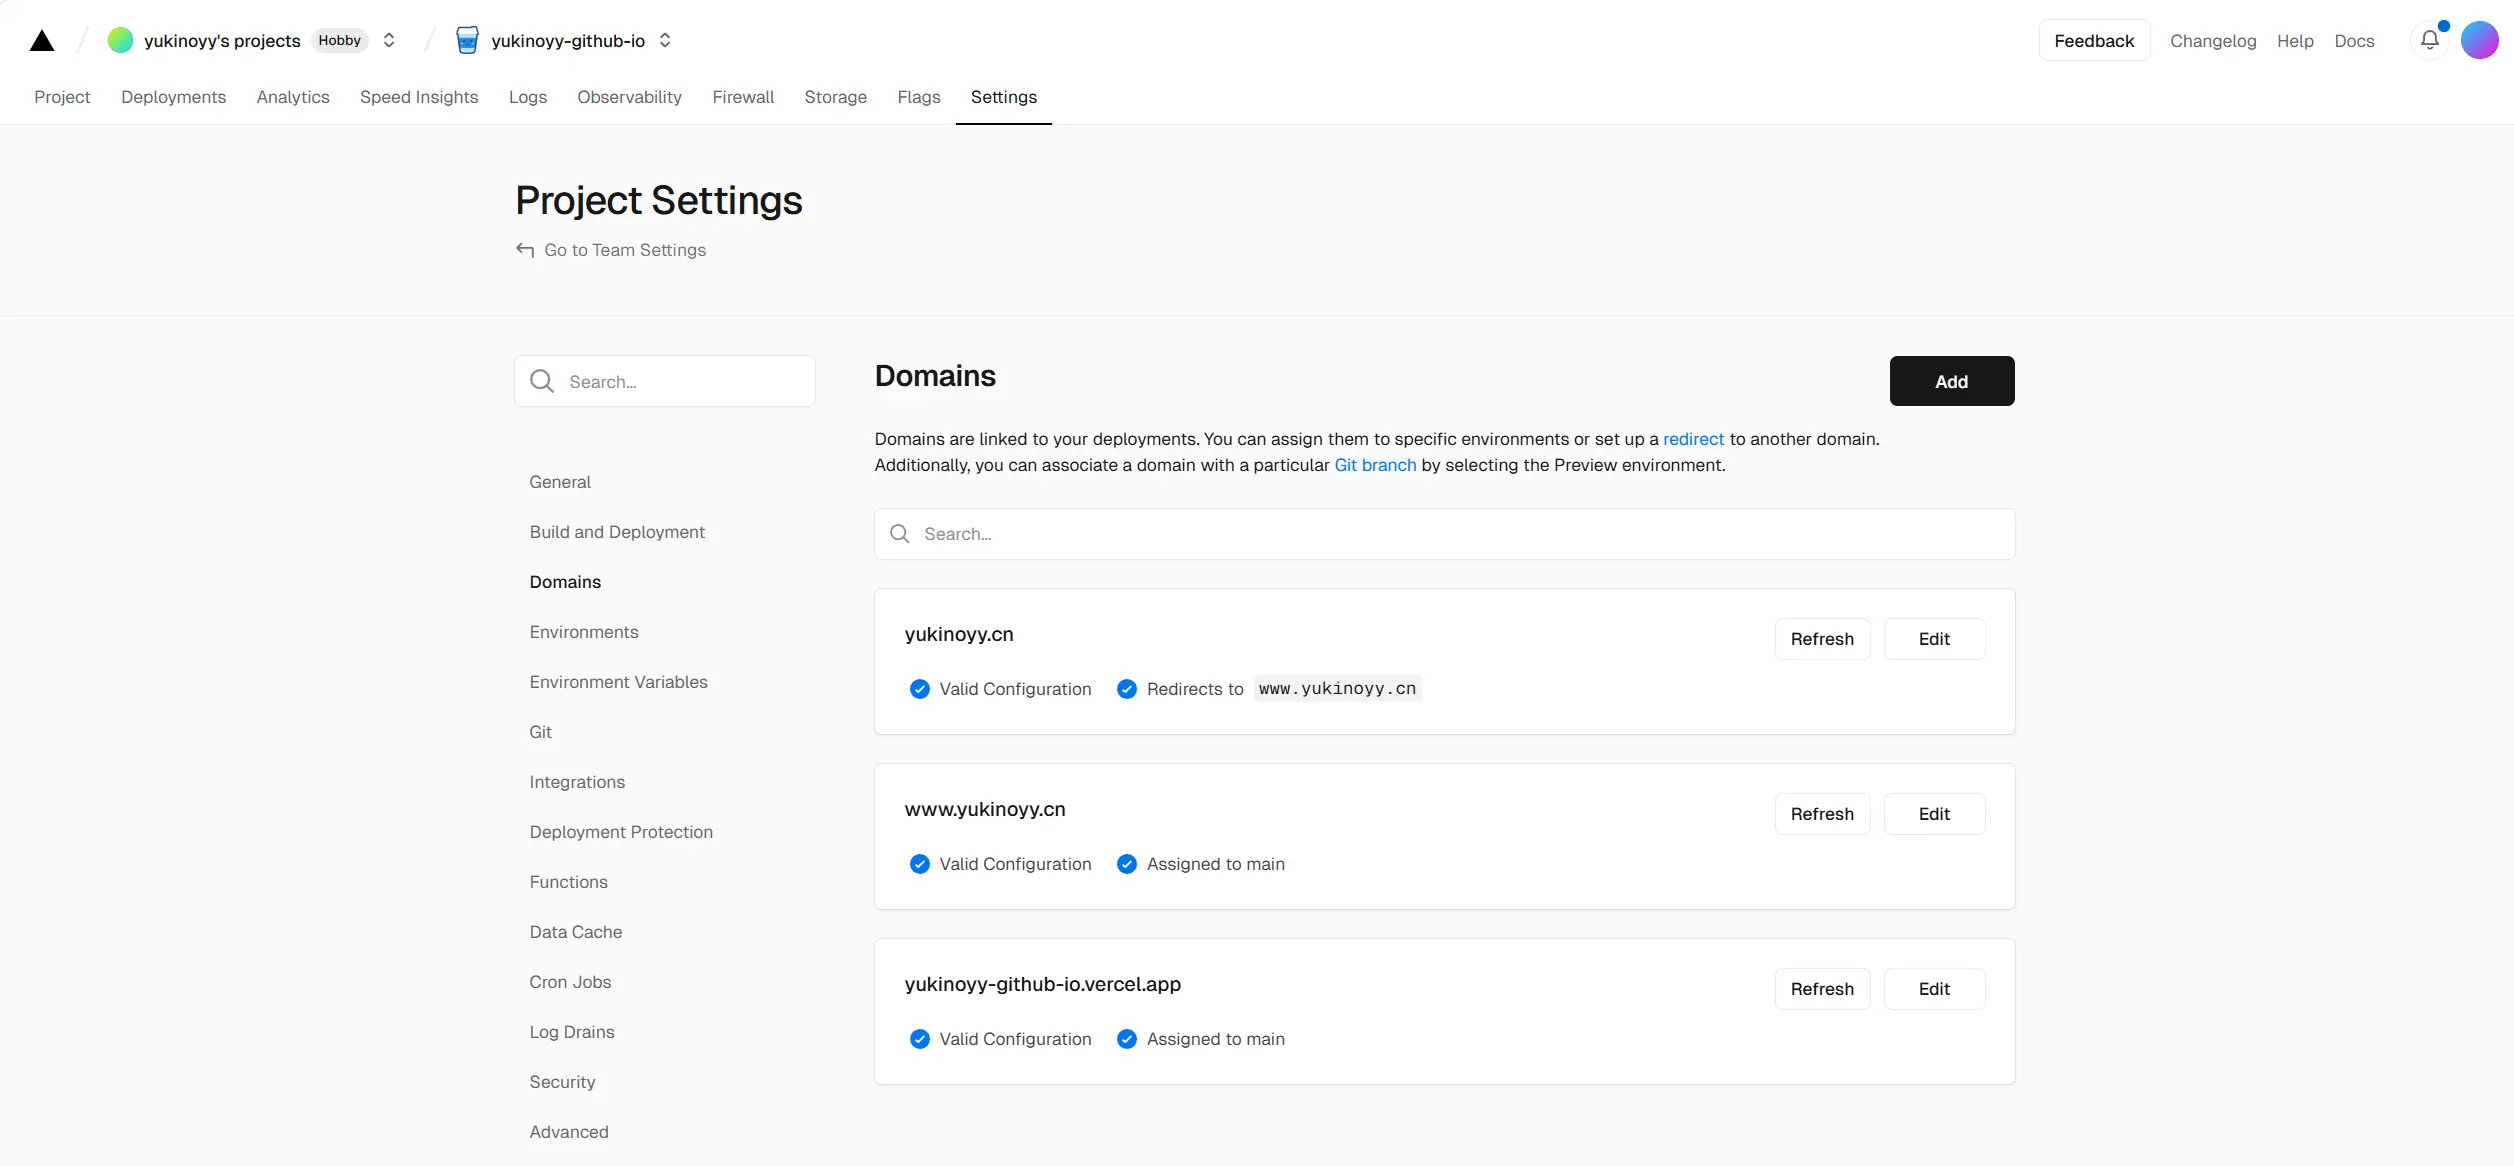
- 进入vercel中,进入你已经部署好的服务或网站的详情页,进入Domains配置,点击添加一条域名解析。这里就直接添加上一步中你所购买的域名即可,例如我这里是
yukinoyy.cn,可选择重定向至www.yukinoyy.cn,添加完毕后会显示一个红叉,点击验证通过后即可。需要注意的是,添加好解析配置之后vercel会推荐一个解析地址,这里不要使用他推荐的地址,直接使用上一步中填写的地址,成功配置页面如下图所示。
- 直接通过所购买的腾讯云域名即可访问在vercel所部署的网站或者服务了。